In this tutorial I’ll be discussing how to use Markov Random Fields and Loopy Belief Propagation to solve for the stereo problem. I picked stereo vision because it seemed like a good example to begin with, but the technique is general and can be adapted to other vision problems easily.
I try my best to make this topic as easy to understand as possible. Most resources on this topic are very heavy on the maths side, which makes it hard for those who aren’t maths buff to grasp. I on the other hand will try to keep the maths to the bare minimum.
If you have any suggestions for improvement please leave a comment!
Table of contents
- Stereo vision problem
- Markov Random Field
- Loopy Belief Propagation
- Sum-Product algorithm
- Max-Product algorithm
- Min-Sum algorithm
- Implementation consideration
- Stereo Results
- Download
Stereo vision problem
The stereo problem asks given a stereo image pair, such as the one below, how can we recover the depth information. I’ve chosen the popular Tsukuba stereo pair commonly used by academics to benchmark stereo algorithms.
The images are taken at slightly different view, similar to our eyes. We know from the parallax effect that objects closer to us will appear to move quicker than those further away. The same idea applies here. We expect the pixels on the statue to have a larger disparity than those in the background.
The Tsukuba stereo pairs have been rectified such that each pixel row in the left image is perfectly corresponds to the right. Or in multi-view geometry speak, the scan lines are the epipolar lines. What this means is that a pixel in the left image has a matching correspondence in the right image somewhere along the same row (assuming it is not occluded). This greatly simplifies the problem because pixel matching just becomes a 1D horizontal line search. This is probably the simplest stereo vision setup you can work with.
Naive attempt at recovering disparity
Having explained the stereo problem, lets attempt to recover the disparity map using simple block matching with the following parameters:
- converted image to greyscale
- 16 disparity levels (pixel search range)
- 5×5 block
- sum of absolute difference (SAD) scoring
- 16 pixel border
This produces the following disparity map
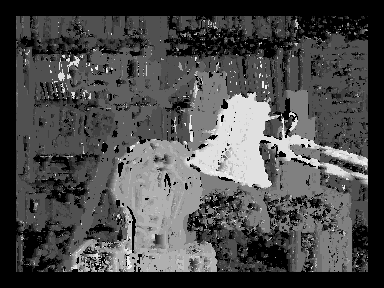
As you can see, the disparity map is rather noisy with holes here and there. Kind of ugly really. We can make out the statue, lamp, and maybe some of the background, with pixels closer to us being brighter. Compare this with the ground truth disparity map.

We could improve the results with some post filtering …. or employ some fancy Markov Random Field (MRF). Lets choose the fancy route!
Markov Random Field
The problem with recovering the disparity map just by looking at each individual pixel and finding the best match is that it ignores neighbouring/context/spatial information. We expect pixels near each other to have similar disparity, unless there is a genuine boundary. This is where MRF are useful.
MRF are undirected graphical models that can encode spatial dependencies. Like all graphical models, they consist of nodes and links. However, unlike some graphical model eg. Bayesian network, they can contain cycles/loops. The stereo problem can be modeled using an MRF as follows for a 3×3 image.
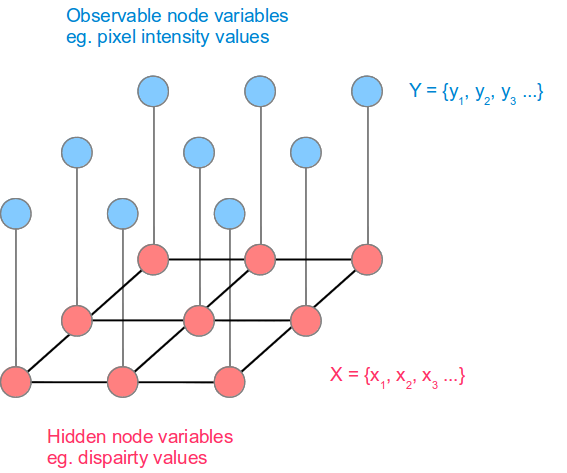
The blue nodes are the observed variables, which in our case are the pixel intensity values. The pink nodes are the hidden variables, which represents the disparity values we are trying to find. The hidden variable values are more generally referred to as labels. I’ll use the term ‘labels’ here on for generality.
The links between each node represents a dependency. So for example, the centre pixel’s hidden node depends ONLY on its 4 neighbouring hidden nodes + the observed node. This rather strong assumption that a node’s state depends only on its immediate neighours is called a Markov assumption. The beauty of this simple assumption is that it allows us to solve for the hidden variables in a reasonably efficient manner.
MRF formulation
We can formulate the stereo problem in terms of the MRF as the following energy function
The variables Y and X are the observed and hidden node respectively, i is the pixel index, j are the neighbouring nodes of node . Refer to the MRF diagram above.
The energy function basically sums up all the cost at each link given an image Y and some labeling X. The aim is to find a labeling for X (disparity map for stereo) that produces the lowest energy. The energy function contains two functions that we will now look at, DataCost and SmoothnessCost.
DataCost
The DataCost function, or sometimes referred to as the unary energy/term/potential, returns the cost/penalty of assigning a label value of to data
. This means we want a low cost for good matches and high value otherwise. An obvious choice is the sum of absolute difference mentioned earlier. There’s also sum of square difference (SSD) and a whole bunch of others out there.
Here’s an example of a very simple DataCost function that only compares a single pixel (in practice you’d calculate it over a block). The pseudo code is:
function DataCost(i, label)
    y = (int)(i / imageWidth) /* integer round down */
    x = i - y*imageWidth

    d = abs(leftImage(x,y) - rightImage(x - label,y))

    return d
end
The disparity direction taken on the rightImage is of course dependent on the stereo pair you are given.
SmoothnessCost
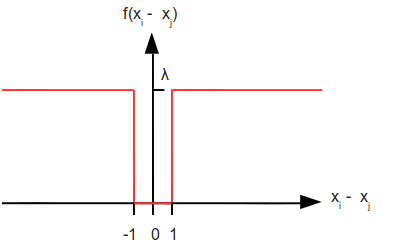
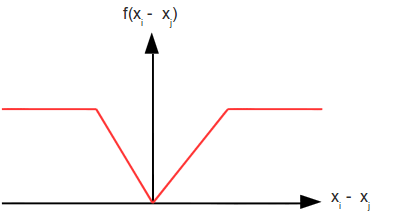
The SmoothnessCost function, or sometimes referred to as the pairwise energy/term/potential, enforces smooth labeling across adjacent hidden nodes. To do this we need a function that penalises adjacent labels that are different. Below is a table showing some commonly used cost functions.
 |
|
 |
|
 |
The Potts model is a binary penalising function with a single tunable variable. This value controls how much smoothing is applied. The linear and quadratic models have an extra parameter K. K is a truncation value that caps the maximum penalty.
Choosing a suitable DataCost and Smoothness function as well as the parameter seems like a black art, at least to me. The papers I’ve come across don’t talk about how they’ve chosen their parameters. My guess is through experimentation.
Loopy Belief Propagation
So we’ve got the MRF formulation patted down. Lets imagine we’ve gone ahead and chosen a DataCost and SmoothnesCost function as well as some parameters to experiment with. But exactly how do we solve the for the energy function? Can we brute force this and try all combinations? Lets see, for the Tsukuba image we’ve got 384×288 = 110592 pixel and 16 disparity levels, which gives us 16^110592 combinations … hmmm where’s my quantum computer. So finding an exact solution is a no go, but if we can settle for an approximate solution then we’re in luck. The loopy belief propagation (LBP) algorithm is one of many algorithms (Graph cut, ICM …) that can find an approximate solution for a MRF.
The original belief propagation algorithm was proposed by Pearl in 1988 for finding exact marginals on trees. Trees are graphs that contain no loops. It turns out the same algorithm can be applied to general graphs, those that can contain loops, hence the ‘loopy’ in the name. However there is no guarantee of convergence.
LBP is a message passing algorithm. A node passes a message to an adjacent node only when it has received all incoming messages, excluding the message from the destination node to itself. Below shows an example of a message being passed from to
.
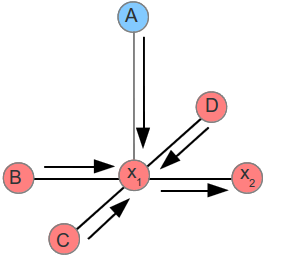
Node waits for messages from nodes A,B,C,D before sending its message to
. As a reminder, it does not send the message from
back to
.
Lets define the message formally as:
This is read as node i sends a message to node j about label l. It is node i’s belief about node j regarding label l. Message passing is only performed on the hidden nodes.
A complete message includes all possible labels. For example you can think of node i’s message to node j along the lines of:
“hey node j, I believe you have label 0 with cost/probability s0”
“hey node j, I believe you have label 1 with cost/probability s1”
…
“hey node j, I believe you have label N with cost/probability sn”
Node i maintains all possible beliefs about node j. The choice of using cost/penalty or probabilities is dependent on the choice of the MRF energy formulation.
LBP Algorithm
Putting together what has been discussed so far, below is one possible implementation of the LBP algorithm for computer vision.
function LoopyBeliefPropgation
    initialise all messages

    for t iterations
        at every pixel pass messages right
        at every pixel pass messages left
        at every pixel pass messages up
        at every pixel pass messages down
    end for

    find the best label at every pixel i by calculating belief
end
The first step is an initialisation of the messages. Earlier on I mentioned that a node has to wait for all incoming messages before sending it off. This causes a bit of a chicken and egg problem on a graph with loops because technically every node would be waiting forever and nothing would get sent. To get around this we initialse all the messages to some constant, giving all the nodes the incoming messages they need to proceed. The initialisation constant is usually either 0 or 1 depending on the energy formuation chosen.
The main part of LBP is iterative. As with most iterative algorithms we can choose to run it for a fixed number of iterations or terminate when the change in energy drops below a threshold, or any other suitable criteria.
At each iteration messages are passed around the MRF. The choice of the message passing scheme is arbitrary. In this example I’ve chosen right, left, up down, but any other sequence is valid. Different sequences will generally produce different results.
Once LBP iteration completes we can find the best label at every pixel by calculating its belief.
We will now look at the three main parts of the LBP algorithm in detail:
- message update
- message initialisation
- belief
for three different algorithms:
- sum-product
- max-product
- min-sum
Each of these algorithms will directly minimise the energy function presented earlier on.
Sum-Product – message update
The sum-product is usually the first algorithm people are taught in regards to belief propagation. It is formulated as:
I’ve written the equation slightly more verbose than what you would typically see in an academic paper. It is split across two lines. As a reminder
= message from node i to node j for label l
= pixel intensity observed at pixel i
means loops over all possible labels (eg. 0 to 15 disparity labels).
This equation is called sum-product because of the outer summation and inner product.
The sum-product algorithm is designed to operate on probability quantities. The exp() function converts the DataCost/SmoothnessCost penalty function into a valid probability value between 0 and , where 0 is “bad” and 1 is “good”.
The inner products (terms inside the outer summation) is the joint probability of DataCost, SmoothnessCost and all the incoming messages for a given label l’. While the outer summation is a marginalisation over the variable l’.
Remember that the complete message is a vector of messages eg.
Just to clarify, when I write without the indexing it means the complete message vector.
You might have noticed that for every label l we have to do a summation over l’. This operation is quadratic in complexity O(L^2), two for loops basically. This is important to keep in mind because increasing the number of labels will incur a quadratic penalty.
Sum-Product – normalisation
One issue arising from continuously multiplying probabilities is that it will tend towards zero and eventually hit floating point limits. To avoid this, the complete message vector needs to be normalised before sending:
Sum-Product – initialisation
Since we are dealing with probabilities all the nodes have their messages initialised to 1 before running LBP.
Sum-Product – belief
The belief at any given node is a product of all incoming messages:
This is read as the belief that node i takes on label l. To find the best label you would go through all possible labels and see which one has the highest belief.
Max-Product – message update
The sum-product finds the best label individually at each node. But this may not actually be the best labeling as a whole! It might sound a bit counter intuitive, but here is a simple example using two binary variables x,y that illustrates this. Lets say x,y has the following probability table:
| P(x,y) | x=0 | x=1 | |
| y=0 | 0.40 | 0.25 | P(y=0) = 0.65 |
| y=1 | 0.00 | 0.35 | P(y=1) = 0.35 |
| P(x=0) = 0.40 | P(x=1) = 0.60 |
The marginals for each variable are on the outer edge of the table. If we were to pick the best configuration using only the individual marginals then we would pick x=1 (0.60) and y=0 (0.65), giving a probability of P(x=1, y=0) = 0.25. But the best configuration is when P(x=0, y=0) = 0.40. What we are really interested in is the max joint probability. This type of problem arises a lot in maximum a posteriori (MAP) assignment problems, where we want to find the BEST assignment as a whole. The max-product algorithm addresses this issue with a slight modification to the sum-product message update equation:
So instead of summing over all possible labels l’ (marginalisation) it keeps track of the largest marginal probability.
The initialisation, normalisation and belief calculation remains the same. The belief at each node is the max-marginal.
One important assumption of the algorithm is that the max-marginal values are unique at each node. When there are ties then it can complicate things. You can break ties by picking one randomly but this will no longer guarantee a MAP assignment. Or you can resolve systematically using something call backtracking, which I won’t dive into because I’m not familiar with it.
Min-Sum – message update
The min-sum algorithm is similar to max-product, in that it finds the max-marginals at each node, but operates in log-space. The min-sum update is given as:
Min-sum is a minimisation problem, because we are trying to find the lowest cost. If we include minus signs on DataCost and SmoothnessCost then it would be a max-sum.
Min-Sum -initialisation
All the messages are initialised to 0.
Min-Sum – normalisation
Normalisation is less straight forward in log-space, being
In practice there’s a good chance you can skip the nornamlisation step. Min-sum operates in log-space so it’s harder to reach underflow/overflow limits, since it’s only doing additions. This is true if the DataCost and Smoothness function returns values that aren’t too large.
Min-Sum – belief
The belief for min-sum is
The term belief here might be a bit misleading. We are actually looking for the belief with the smallest value, a better name might simply be cost to avoid confusion.
Implementation consideration
If possible, use the min-sum algorithm because it’s the most computationally efficient out of the three algorithms mentioned. It doesn’t have any expensive exp() functions and uses mainly addition operations. It is also easy to implement using only integer data types, which may give some performance boost.
If you need to implement the sum-product for whatever reason then you will probably need to introduce a scaling constant when calculating exp() to avoid underflow eg. exp(-DataCost(…)*scaling) * exp(-SmoothnessCost(..)*scaling), where scaling is a value between 0 and 1.
Stereo results
Alright, we’ve gone through a fair bit of theory but now lets revisit the stereo vision problem! We’ll use the Tsukuba images again and run belief propagation with the following parameters:
- converted image to greyscale
- 5×5 block
- 16 disparity labels (ranging from 0 to 15)
- DataCost using linear model
- SmoothnessCost using truncated linear model, truncated at 2, with
- Min-sum optimisation algorithm
- 40 iterations of loopy belief propagation
This gives us the following disparity map
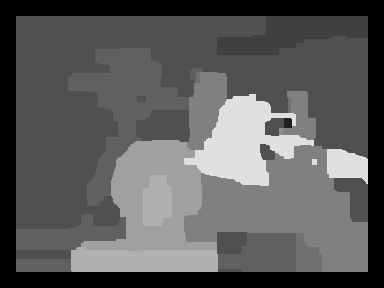
which is a much nicer disparity map than on our first attempt! The disparities are much smoother. We can make out the individual objects much better than before, especially the camera on the tripod in the background. Below shows a plot of the energy for each iteration.
There’s a slight increase in energy on the 10th iteration, but after that it monotonically decreases where it flattens off around the 25th iteration. Remember that the LBP algorithm is not guarantee to converge, which means there’s no guarantee that the energy will decrease at every iteration either.
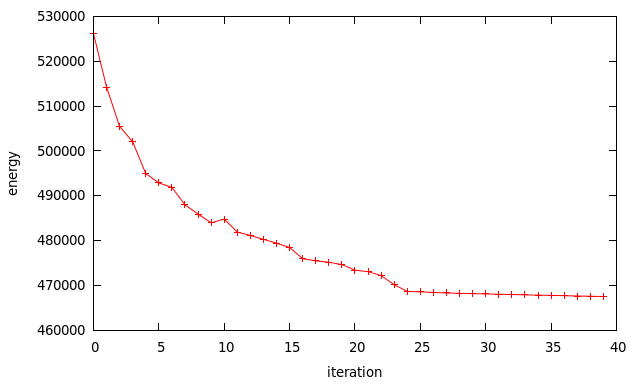
What’s interesting to compare is the energy obtained from LBP and that from the ground truth image. Using the same energy function for generating the disparity map, the Tsukuba ground truth returns an energy of 717,701. This is actually higher than the final energy returned from LBP. So what can we say from this? This suggests our energy formulation doesn’t quite accurately model real life, in our case its quite an over simplification. The more recent algorithms take occlusion, and possibly more, into account. Have a look at http://vision.middlebury.edu/stereo for the latest and greatest in stereo algorithms.
Download
You can download my implementation of LBP here. It’ll generate the same results you see on this site.
It requires OpenCV 2.x installed.
On Linux, type make to compile and run it via bin/Release/LoopyBP. It’ll read the two Tsukuba image files and output the disparity image as output.png. I’ve also included the ground truth image for reference.
License
The code is released under the simplified BSD license, see LICENSE.txt inside the package for more information.
Useful resources
Here are some resources that I found useful in creating this tutorial.
- General background knowledge on probabilistic graphical models was learnt from Coursera’s PGM class. This was a very challenging but rewarding course. https://www.coursera.org/course/pgm
- Diagram showing basic MRF model for image processing with some general description, http://classes.soe.ucsc.edu/cmps290c/Spring04/proj/BPApp.pdf
- Parameters for the Tsukuba pair were obtained from http://vision.middlebury.edu/MRF/results/tsukuba/index.html
- Good and concise reference on belief propagation, https://github.com/daviddoria/Tutorials/blob/master/BeliefPropagation/BeliefPropagation.pdf?raw=true
- Slides explaining subtleness of max-product vs sum-product, http://www.cedar.buffalo.edu/~srihari/CSE574/Chap8/Ch8-GraphicalModelInference/Ch8.3.3-Max-SumAlg.pdf


Great tutorial, thanks!
Thanks 🙂
Nice tutorial !
One clarification : For your data function, we have
function DataCost(i, label)
y = i / imageWidth
x = i – y*imageWidth
…….
Clearly, while calculating x, if we replace “y” with its definition from above, we get
x = i – i = 0
Was there a typo somewhere ??
Also, this is more of a conceptual question : as far as i knw, a disparity image is just the “difference” of the left and right images. Now, I am wondering how the disparity image is almost similar to the actual image
thanks !
The formula is correct, but I forgot to mention they’re integer operations. It should be
y = (int)(i / imageWidth)
For example, if we have an image that is 640×480, and look at the pixel at (200,100), then
i = 100*imageWidth + 200
i = 100*640 + 200
i = 64200
Using the equation to decompose back to (x,y) we get
y = (int)(64200/640) = 100 (rounded down)
x = 64200 – 10*640 = 200
which confirms it is correct.
The disparity image indicates the ‘depth’ of each pixel. If you were to manually do it by looking at each pixel in the left image and finding where it appears in the right image, find the absolute difference in x values, you’ll get the disparity map. It’s basically like a 3D image, that’s why it looks somewhat similar to the original image.
Hi,
nice description of LBP!
One minor issue though:
In section “Min-Sum – normalisation”, the equation for A seems to be incorrect:
I think it should be A = – log( SUM( exp( – msg) ) )
That’s the equivalent of “Sum-Product – normalisation” in log-space.
This is how I did it in my head:
Let M = [0.1 0.2 0.3], a message vector that needs to be normalised. Assume M is in normal probability space eg. [0,1], then
M_norm = M / sum(M) —> [0.16667 0.33333 0.50000]
Now let’s see if we can derive the same result above in log space.
B = log(M) —> [-2.3026 -1.6094 -1.2040]
A = log(sum(exp(B))) —> -0.51083
B_norm = (B – A) —> [-1.79176 -1.09861 -0.69315]
Verifying the results.
exp(B_norm) —> [0.16667 0.33333 0.50000]
Same as M_norm.
which is the same as M_norm.
Did I do something wrong?
All the sample code I’ve seen (e.g., in OpenCV and http://cs.brown.edu/~pff/bp/) that implement min-sum BP simply subtract the mean out for message normalization (which yields a zero mean):
M = [0.1, 0.2, 0.3]
mean = 0.2
M_NORM = [-0.1, 0.0, 0.1]
I always understood this as the following: if you want the product of probabilities to be 1, then you want the sum of the logs to be zero, e.g.:
A * B * C = 1
log(A*B*C) = log(A) + log(B) + log(C) = log(1) = 0
Is this incorrect?
P.S. Great BP tutorial!
Hmmm, if M is in log-space then you can’t do a simple mean subtraction. I’m not familiar with this way of normalizing for min-sum. Maybe someone here who knows the answer can chime in.
Hi,
Nice tutorial! It helps me a lot.
A small concern: for your data term.
function DataCost(i, label)
d = abs(leftImage(x,y) – rightImage(x – label),y)
end
I just do not quite understand why there is a ”-lable” in “rightImage(x – label,y)”,
Can you simply explain?
Many thanks
Hi,
You can think of the variable “label” as “disparity in pixels”. This cost function was designed for the stereo image I used in this tutorial.
I’m basically doing, for a given pixel in the left image at (x,y) look at other possible pixels in the right image along the x-axis, in the range [x – MAX_DISPARITY, x].
I’m exploiting the fact that a pixel in the left image cannot have a matching pixel greater than position ‘x’ in the right image.
Thanks very much for your help. I will read your code and the tutorial carefully. It really helps. Thanks a lot for sharing.
Hello,
very nice tutorial.
I was trying to implement the code in MATLAB.
You have not done any normalisation, so most of the values are reaching 255 after first iteration.
what should be the normalisation.
Should there be any data truncation for data cost.
You shouldn’t need any normalisation. If you’re seeing 255 in the disparity map then something is wrong because I’ve set the limit to 16.
Hello,
Lets say the direction is Right,
then the message mrf.grid(y,x).msg(2,label) increases as x increases in the right direction, the message finally reach 255.
For finding the MAP assignment, cost should adds up to greater than 255,
but since cost is uint8, it also remain 255.
Please help
This is possible. That’s why you see in my code I use an unsigned int in the Pixel struct.
can u upload ur matlab code if completed
Hi Nghia,
I just noticed that, to find the minimum cost of assigning two labels (say label size is L) to two adjacent grids, we need to do O(L^2) message updates, right? It’s computationally expensive.
I also noticed that someone has new methods like min-convolution that can reduce the complexity to o(L), are you familiar with that? I hope can talk with you further.
Sincerely,
Viky
Yep it’s O(L^2), if you look in my code in the function SendMsg, there’s 2 nested for loops over the number of labels (L). It’s only expensive if you have an expensive cost function. For my stereo example the cost is extremely cheap, so the computation cost is irrelevant. But if you have an expensive cost function it might be possible to cache the results if you have enough memory.
I’m not familiar with the newer methods. I haven’t put more time into belief propagation than what is already presented in my blog.
Thank you very much for your reply~
several formulas can not be seen in website, would you email a pdf version for me? thank you!
Try this http://nghiaho.com/uploads/loopyBP.pdf
I’ve taken the coursera PGM and Artificial Vision courses. Have you looked at the using the FastPD MRF for this or other computer vision tasks. I appears that much of the development happened at Ecole Centrale Paris:
http://vision.mas.ecp.fr/
Code: http://www.csd.uoc.gr/~komod/FastPD/
I haven’t investigate beyond the basic MRF presented in the PGM course. My interest for them kind of just stopped there.
DD-MRF appear to be a better algorithm for stereo matching.
Awesome post. I have one single doubt in your code
In the function SendMsg, after computing the min for all the labels you have a for loop which goes like this
for(int i=0; i < LABELS; i++) {
switch(direction) {
case LEFT:
mrf.grid[y*width + x-1].msg[RIGHT][i] = new_msg[i];
break;
case RIGHT:
mrf.grid[y*width + x+1].msg[LEFT][i] = new_msg[i];
break;
case UP:
mrf.grid[(y-1)*width + x].msg[DOWN][i] = new_msg[i];
break;
case DOWN:
mrf.grid[(y+1)*width + x].msg[UP][i] = new_msg[i];
break;
default:
assert(0);
break;
}
}
I am not sure as to why have do you update the array of the opposite direction
for example if the parameter to the function is RIGHT,
this will update values for LEFT?
I am confused.
It is a little confusing. But this is how it works. Say I am at pixel (100,100) and I want to send my message LEFT to pixel (99,100). Now pixel (99,100) has 5 message boxes. In this case it puts the message received from (100,100) into its “RIGHT” message box, because (100,100) is to the right of it.
Hi,
Thanks again for the awesome tutorial. Can you explain your MAP function? It’s confusing as to what are you doing there? I am not sure what did you perfrom after all the messages have been passed, how do you reduce your energy?
The MAP finds the “best” label for the given node according to the energy function. Have a look at the C++ code for the MAP function. It might be simpler to read than the maths equation.
Why have you considered the SmoothnesCost in the MAP function? The formula for Belief does not include any such thing.
if(x-1 >= 0) energy += SmoothnessCost(cur_label, mrf.grid[y*width+x-1].best_assignment);
if(x+1 = 0) energy += SmoothnessCost(cur_label, mrf.grid[(y-1)*width+x].best_assignment);
if(y+1 < height) energy += SmoothnessCost(cur_label, mrf.grid[(y+1)*width+x].best_assignment);
The comment for the MAP function is
// Finds the MAP assignment as well as calculating the energy
So it calculates the MAP and the energy, separately.
Some of the equations which are images can not be shown, really want to read this article…
There’s a PDF link
http://nghiaho.com/uploads/loopyBP.pdf
Thanks great explanation.
I found the CPP code really good and I want to run it in java. Do you have a java implementation of it? Or recommend an easy way to use it in java?
I don’t have a java implementation, nor do I use it. So unfortunately you’ll have to translate it yourself line by line 😐
Yes thats fine 🙂 I can do it. Thanks.
Furthermore, I am adopting this implementation of the loopy belief algorithm to solve a different problem altogether. It is to solve a jigsaw puzzle. So I have couple of question..if u have an idea and can help with them it is much appreciated.
1. If i understood ur algorithm correctly…you are are saving the probabilities for each layer u want to compare with..thats why the number 16.Is my understanding correct?
2.If yes to 1, in a jigsaw puzzle this means saving the probability for each piece..thats a bit too intensive i feel. So will it be a good idea to eliminated the pieces already considered so that the amount of probabilities saved will reduce over time?
3.If I choose to go down that path I feel that the output will be a local minimum..but is there any other way to solve it?
Hope I did not ask too many unrelated questions…Thanks for your help.
16 is the total number of possible “labels” each pixel can take, and the algorithm keeps track of all 16*16 = 256 pair probablities. I’m not familiar with applying LBP to your jigsaw problem so I am of no help there.
Hello, nice tutorial, thanks for taking the time to create it.
I have a little doubt. In the message update equations, you have considered the DataCost calculation as follows: “exp( -DataCost ( yi , l ) )” . I think it should be “exp( -DataCost ( yi , l’ ) )”, i.e. exchange ” l ” by ” l’ ” (l prime) . I checked your 4th reference to confirm. Please let me know if I’m right or wrong.
Best regards.
I think you’re right. Mistake on my part.
Thanks, big help!
i need how to determined the structure from the motion in image i need matlab coding plz..sir/mam help me…
wrong place
Hi, thanks for the article. IYou have a typo. Instead of `d = abs(leftImage(x,y) – rightImage(x – label),y)` it should be `d = abs(leftImage(x,y) – rightImage(x – label,y))`
Well spotted!
I found this tutorial very interesting. Do you have any other links from I can study about GraphCuts method?
Glad you found it useful. I don’t have any other links on top of my head.
Hey, about the section “Min-Sum – message update”. When you say neighbors of i expect j, does it mean that the observed nodes are to be taken?
Made a spell error. Should be `except` instead of expect. Sorry about that.
In the stereo example, a pixel is surrounded by 4 other pixels (up, down, left, right). The “except” part means you only consider 3 of the pixels and exclude the other one. The other one being “j”.
Can you tell me how to determine the order of each node to update its message while applying loopy belief propagation, can you give me an example?
There’s no correct order, I just picked mine arbitrarily. As long as you pass left/right/up/down then it should be fine.
Hi,
I am new to this field. Your tutorial is great. However, when I run your code ,it failed with message “Error reading left image”.
Could you help me figure out what wrong with me?
Thanks.
It looks for “tsukuba-imL.png” “tsukuba-imR.png” in the same directory as the executable.
Thanks for you reply.
I put the both images in the executable folder, but it does not work. Then I used imshow() to check the code has read the images, it just plot the left image then errors occur.( I used Visual studio C++ 2010) .
I am transferring your code to Octave , hope that it works.
Try running the program using a command prompt, not through the IDE.
Hello. Thank you for such a great document! But I have a question.
When I update the message with min-sum rule, I understand that I have to find the minimiser (in the case of an image, it would be one pixel value). I can find that from the data cost and smoothness cost, but how can I find the minimiser from the messages from the neighbours of the sender to the sender node? (in that case, l`)
I’m unclear on what you mean. Can you point to where in my post specifically you’re having trouble? Or alternatively look at my code for implementation.
I have found some small bugs in your code when I blindly implement in octave.
In section add border around image, border should equal to Labels+wradius otherwise, some index of image (y+dy,x+dx-label) in DatacostStereo function would be negative.
Your code is really easy to read. Loopy belief propagation seems to take a bit long time to run although the result looks great.
Thanks for your post. Hope to see more nice tutorials from your blog.
Thanks for the bug report!
Hi! I think this is a really good tutorial!
I have a question about normalization. I read some other books and found many people use 1/Z as a coefficient to normalize the messages. How to calculate Z? Especially in your program(I have run it and it works well), where should I add 1/Z?
Could you send me an Email? Thanks a lot!
Hi,
My memory is a bit fuzzy, but I believe the 1/Z is something you don’t need to do in practice if you are just interested in solving MAP to get the best labels. Maybe someone with more experience can answer this.
Hi, I used my data cost and smooth function to run your program, I found the messages were becoming larger and larger, could you give more details about Min-Sum – normalisation? Thanks a lot!
What is your cost and smooth function?
i tried to implement sum-product algorithm.. i didnt get the output..can u help me out what values needs to be taken for scaling and lambda value ?
I no longer have time for this project. Best to use my c++ code and hack it for your project.
Nice tutorial, worth reading!
Thank you.
Thank you for the tutorial!
Just one question, in the MAP function you do:
if(cost best ?
what will mrf.grid[i].best_assignment be?
Thanks!
My comment was not displayed correctly:
if(cost best?
what mrf.grid[i].best_assignment will be?
You don’t initialize best_assignment. If cost is larger than best what happens?
best is set to highest possible number, it’s impossible to be higher than best
Hi there thank you for the tutorial. I made a mex function fir your code and was wondering why the message update in all iterations is done on the min value from previous pixels. When going through pixels if one has a value greater than 65535 then won’t it propergate through and make the algorithm get stuck?
I’m using a 32bit unsigned int. My memory is a bit fuzzy on my choice of implementation but it was meant to be the same algorithm from what I learnt on Coursera.
Great Tutorial. Thanks 🙂
For the incoming messages, let’s say, I’m at the top layer — it only has at most two neighbors, but when I specify a direction I am looking for all neighbors not the one I’m sending too. For example, if I am sending RIGHT.. I look LEFT, TOP, and DOWN, but if I am the top layer, I do not have a top neighbor; this shouldn’t be an issue since its zero but just wondering.
You are correct here and that’s my thought process. I don’t know if there’s more to discuss beyond that.
I want to implement datacost and smoothness cost in matalab can u help m
You’re on your own with this one. Maybe someone else reading this can.
Hi harshada
did you implement the datacost and smoothness cost in matalab ? I am in the same situation and I can’t understand how to implement the smoothness cost to use it with the GCO 3.0 http://vision.csd.uwo.ca/code/gco-v3.0.zip
thanks I hope that you will see my message 🙂
Excellent tutorial! Really cleared up the concepts.
That’s the best paper on the subject.
clear, fluent, intuitive, thanks a lot for your time.
Hello,I am a new hand,I need to write a essay,then I read your article,so excellent.
I want to manipulate this operation,I had download your file,then what should I do,such as some programs to operate it ,C language?? linux?? please tell me ,really thanks~
It’s C++.
Hi nghiaho12,
First a great thankfull for your algorithm ! It works very well and I am very impressed.
Second, Do you think it will be possible to implement this algorithm in C ? it seems very complicated…
Regards,
PierLow
Hey there!
How could this be applied for voxel (3D) classification?
Thanks for this nice and easy to follow article! 🙂
I have a question. Why the joint probability in the given table above (sum-product section) doesn’t sum to one??
Good catch! I’ll address it.
Not sure, if this is still maintained, but I try my luck anyways:
I have learned, that message updates depend only on the messages of the previous iteration. However in your code, in SendMsg(), you update the messages of neighboring pixels and use this result, when you process the next pixel. For example, when direction is RIGHT, you set the LEFT message of pixel y * width + x + 1. Due to the loop in BP() this pixel is processed next and will use the updated LEFT message.
Am I mistaken or is this a flaw in your code?
I don’t have an answer for this. A quick search from https://raw.githubusercontent.com/daviddoria/Tutorials/master/BeliefPropagation/BeliefPropagation.pdf mentions this:
8.2 Update Schedule
As noted in 7, there is no natural ordering of the nodes in an MRF. Because of
this, you can update message in any order you would like. Often, a raster scan
of the MRF is used. Alternatively, the message to update can also be selected
at random.
It doesn’t quite answer what you’re asking though.