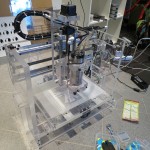
We (being myself and my buddy Jay) have been working on a fun vision pet project over the past few months. The project started from a little boredom and lots of discussion over wine back in July 2013. We’ve finally got the video done. It demonstrates our vision based localisation system (no GPS) on a car.
The idea is simple, to use the horizon line as a stable feature when performing image matching. The experiments were carried out on the freeway at 80-100 km/h (hence the name of the project). The freeway is just one long straight road, so the problem is simplified and constrained to localisation on a 1D path.
Now without further adieu, the video
We’re hoping to do more work on this project if time permits. The first thing we want to improve on is the motion model. At the moment, the system assumes the car travels at the same speed as the previously collected video (which is true most of the time, but not always eg. bad traffic). We have plans to determine the speed of the vehicle more accurately.
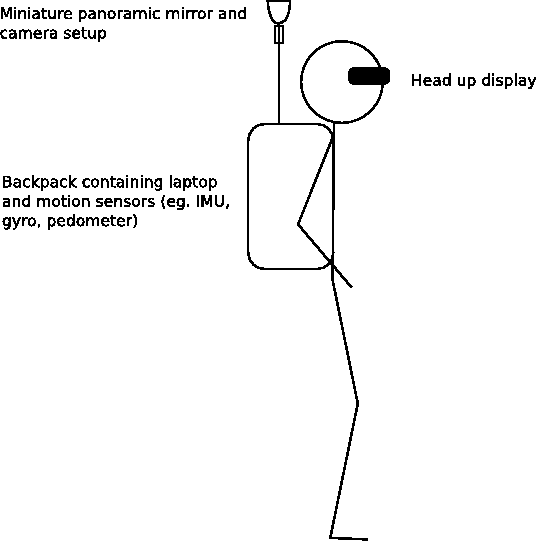
Here’s an amusing sketch I did for one of my thesis chapter back in November 2008. It was captioned “Concept design of augmented reality system using the vision based localisation”. A friend made it comment it looked like a xkcd drawing.
The sketch is pretty crude and funny in hindsight. I originally added it to my thesis to give it an extra “visionary” depth, kind of predicting the future so to speak. I didn’t think anyone would seriously wear such bulky equipment, plus it made you look silly. A few years later Google made this …
That’s a Google streeview trekker. Different application to what I proposed but the design is not far off!
I should keep a record of all my ideas that I dismiss as impractical and ridiculous. Just so on the off chance someone does implemented it successfully I can get all smug and say I thought of it first 🙂 And then get jealous I didn’t captialise on it …
Every now and then when I’m free and bored, I do a daily git fetch on the OpenCV branch to keep up to date with the latest and greatest. One of my favourite things to do is run cppcheck on the source code to see what new bugs have appeared (I should find a new hobby). For those who don’t know what cppcheck is, it is an open source static code analyzer for C/C++. It will try to find coding mistakes eg. using an uinitialised variable, memory leak, and more. In other words, it is a must have tool, use it, and use it often.
To demonstrate its effectiveness, I just updated my OpenCV 2.4 branch as of 15th Dec 2013 and ran cppcheck on it, resulting in:
$ cppcheck -q -j 4 .
[features2d/src/orb.cpp:179]: (error) Uninitialized variable: ix
[features2d/src/orb.cpp:199]: (error) Uninitialized variable: ix
[features2d/src/orb.cpp:235]: (error) Uninitialized variable: ix
[features2d/src/orb.cpp:179]: (error) Uninitialized variable: iy
[features2d/src/orb.cpp:199]: (error) Uninitialized variable: iy
[features2d/src/orb.cpp:235]: (error) Uninitialized variable: iy
[imgproc/src/color.cpp:773]: (error) Array 'coeffs[2]' accessed at index 2, which is out of bounds.
[imgproc/test/test_cvtyuv.cpp:590]: (style) Class 'ConversionYUV' is unsafe, 'ConversionYUV::yuvReader_' can leak by wrong usage.
[imgproc/test/test_cvtyuv.cpp:591]: (style) Class 'ConversionYUV' is unsafe, 'ConversionYUV::yuvWriter_' can leak by wrong usage.
[imgproc/test/test_cvtyuv.cpp:592]: (style) Class 'ConversionYUV' is unsafe, 'ConversionYUV::rgbReader_' can leak by wrong usage.
[imgproc/test/test_cvtyuv.cpp:593]: (style) Class 'ConversionYUV' is unsafe, 'ConversionYUV::rgbWriter_' can leak by wrong usage.
[imgproc/test/test_cvtyuv.cpp:594]: (style) Class 'ConversionYUV' is unsafe, 'ConversionYUV::grayWriter_' can leak by wrong usage.
[legacy/src/calibfilter.cpp:725]: (error) Resource leak: f
[legacy/src/epilines.cpp:3005]: (error) Memory leak: objectPoints_64d
[legacy/src/epilines.cpp:3005]: (error) Memory leak: rotMatrs1_64d
[legacy/src/epilines.cpp:3005]: (error) Memory leak: rotMatrs2_64d
[legacy/src/epilines.cpp:3005]: (error) Memory leak: transVects1_64d
[legacy/src/epilines.cpp:3005]: (error) Memory leak: transVects2_64d
[legacy/src/vecfacetracking.cpp] -> [legacy/src/vecfacetracking.cpp:670]: (error) Internal error. Token::Match called with varid 0. Please report this to Cppcheck developers
[ml/src/svm.cpp:1338]: (error) Possible null pointer dereference: df
[objdetect/src/hog.cpp:2564]: (error) Resource leak: modelfl
: (error) Division by zero.
[ts/src/ts_gtest.cpp:7518]: (error) Address of local auto-variable assigned to a function parameter.
[ts/src/ts_gtest.cpp:7518]: (error) Uninitialized variable: dummy
[ts/src/ts_gtest.cpp:7525]: (error) Uninitialized variable: dummy
cppcheck -q – j 4, calls cppcheck in quiet mode (only reporting errors) using 4 threads.
The orb.cpp errors are fairly new. The others have been there for a while because I didn’t bother sending a pull request for the legacy functions, because well, they’re legacy. But I should.
The error in tvl1flow.cpp is a false alert, which I’ve reported and has been resolved. Basically, someone used a variable called div, which cppcheck confuses with the stdlib.h div function, because they both have the same parameter count and type, naughty.
vecfecetracking.cpp is an interesting one, cppcheck basically failed for some unknown reason. Though it rarely occurs. I should report that to the cppcheck team.
hog.cpp reports a resource leak because an fopen was called prior but the function calls a throw if something goes wrong without calling fclose, as shown below:
void HOGDescriptor::readALTModel(std::string modelfile)
{
   // read model from SVMlight format..
   FILE *modelfl;
   if ((modelfl = fopen(modelfile.c_str(), "rb")) == NULL)
   {
       std::string eerr("file not exist");
       std::string efile(__FILE__);
       std::string efunc(__FUNCTION__);
       throw Exception(CV_StsError, eerr, efile, efunc, __LINE__);
   }
   char version_buffer[10];
   if (!fread (&version_buffer,sizeof(char),10,modelfl))
   {
       std::string eerr("version?");
       std::string efile(__FILE__);
       std::string efunc(__FUNCTION__);
       // doing an fclose(modefl) would fix the error
       throw Exception(CV_StsError, eerr, efile, efunc, __LINE__);
   }
With holidays coming up in a week I’ll probably get off my lazy ass and submit some more fixes. What I find funny is the fact that I’ve been seeing the same errors for the past months (years even?). It seems to suggest cppcheck needs to be publicised more and possibly become part of the code submission guideline. I feel like I’m the only one running cppcheck on OpenCV.
UPDATE:
Running with the latest cppcheck 1.62 produces less false alerts than before (was running 1.61). I now get:
[highgui/src/cap_images.cpp:197]: (warning) %u in format string (no. 1) requires 'unsigned int *' but the argument type is 'int *'.
[imgproc/test/test_cvtyuv.cpp:590]: (style) Class 'ConversionYUV' is unsafe, 'ConversionYUV::yuvReader_' can leak by wrong usage.
[imgproc/test/test_cvtyuv.cpp:591]: (style) Class 'ConversionYUV' is unsafe, 'ConversionYUV::yuvWriter_' can leak by wrong usage.
[imgproc/test/test_cvtyuv.cpp:592]: (style) Class 'ConversionYUV' is unsafe, 'ConversionYUV::rgbReader_' can leak by wrong usage.
[imgproc/test/test_cvtyuv.cpp:593]: (style) Class 'ConversionYUV' is unsafe, 'ConversionYUV::rgbWriter_' can leak by wrong usage.
[imgproc/test/test_cvtyuv.cpp:594]: (style) Class 'ConversionYUV' is unsafe, 'ConversionYUV::grayWriter_' can leak by wrong usage.
[legacy/src/calibfilter.cpp:725]: (error) Resource leak: f
[legacy/src/epilines.cpp:3005]: (error) Memory leak: objectPoints_64d
[legacy/src/epilines.cpp:3005]: (error) Memory leak: rotMatrs1_64d
[legacy/src/epilines.cpp:3005]: (error) Memory leak: rotMatrs2_64d
[legacy/src/epilines.cpp:3005]: (error) Memory leak: transVects1_64d
[legacy/src/epilines.cpp:3005]: (error) Memory leak: transVects2_64d
[ml/src/svm.cpp:1338]: (error) Possible null pointer dereference: df
[objdetect/src/hog.cpp:2564]: (error) Resource leak: modelfl
[ts/src/ts_gtest.cpp:7518]: (error) Address of local auto-variable assigned to a function parameter.
[ts/src/ts_gtest.cpp:7518]: (error) Uninitialized variable: dummy
[ts/src/ts_gtest.cpp:7525]: (error) Uninitialized variable: dummy
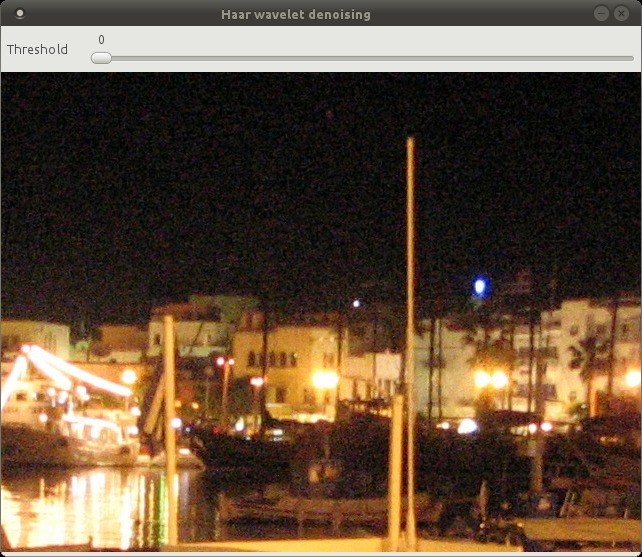
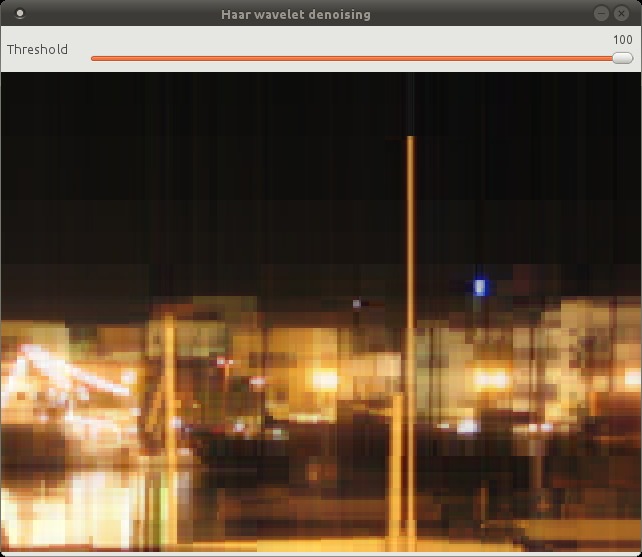
This is some old Haar wavelet code I dug up from my PhD days that I’ve adapted to image denoising. It denoises an image by performing the following steps
Pad the width/height so the dimensions are a power of two. Padded with 0.
Do 2D Haar wavelet transform
Shrink all the coefficients using the soft thresholding: x = sign(x) * max(0, abs(x) – threshold)
Inverse 2D Haar wavelet transform
Remove the padding
I’ve coded a simple GUI using OpenCV to show the denoising in action. There’s a slider that goes from 0 to 100, which translates to a threshold range of [0, 0.1].
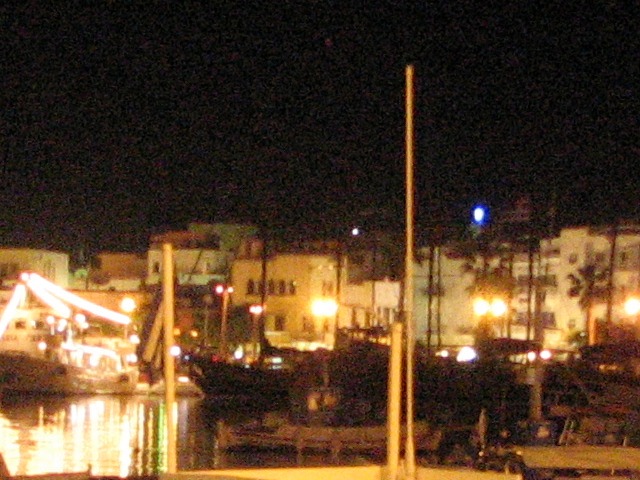
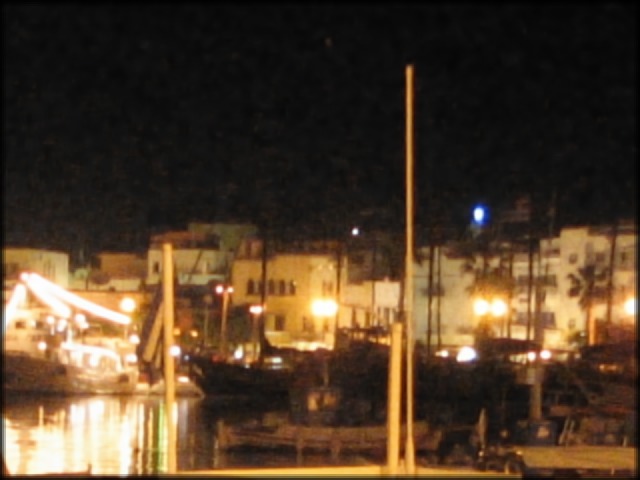
I’ll use the same image in a previous post. This is a cropped image taken at night on a point and shoot camera. The noise is real and not artificially added.
The Haar wavelet does a pretty good job of preserving edges and sharp transitions in general. At threshold = 100 you start to see the blocky nature of the Haar wavelet.
One downside of using the Haar wavelet is that the image dimensions have to be a power of two, which wastes memory and CPU cycles when we have to pad the image.
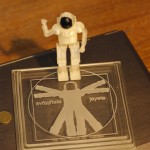
Had a busy weekend crafting this small gift of appreciation for our PhD supervisor. The design was a collaborative effort with my colleagues. The base features an Asimo version of Da Vinci’s Vitruvian Man. It took us from 10.30 am to 5.30 pm to complete the base due to a lot of filing/sanding (tool wasn’t sharp enough) and design changes along the way. The Asimo figured was 3D printed by Jay and took about 5 hours. Overall, everything was completed from start to finish within 5 days, after many many many email exchanges between us.
This is a continuation from the last post. This time I implemented translation + horizontal flipping. The translation works by cropping the 32×32 image into smaller 24×24 sub-images (9 to be exact) to expand the training set and avoid over fitting.
This is the network I used
Layer 1 – 5×5 Rectified Linear Unit, 64 output maps
Layer 2 – 2×2 Max-pool
Layer 3 – 5×5 Rectified Linear Unit, 64 output maps
Layer 4 – 2×2 Max-pool
Layer 5 – 3×3 Rectified Linear Unit, 64 output maps
Layer 6 – Fully connected Rectified Linear Unit, 64 output neurons
Layer 7 – Fully connected linear units, 10 output neurons
Layer 8 – Softmax
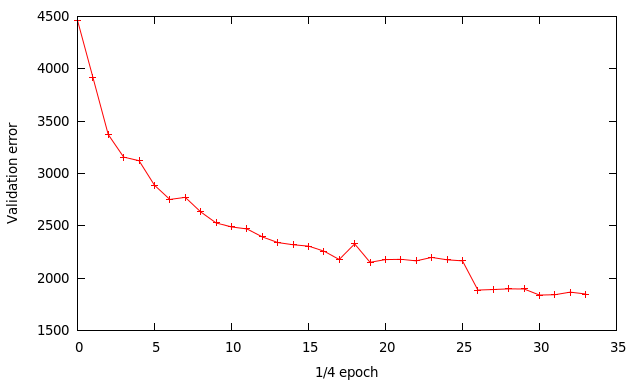
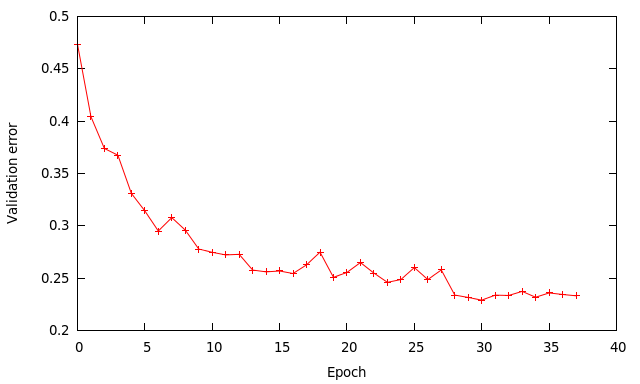
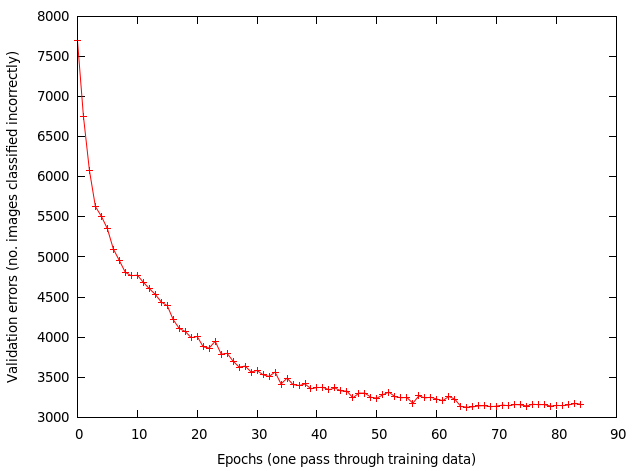
Below is the validation error during training. I’ve changed the way the training data is loaded to save memory. Each dataset is loaded and trained one at a time, instead of loading it all into memory. After a dataset is trained I output the validation error to file. Since I use 4 datasets for training each data point on the graph represents 1/4 of an epoch (one pass through all the training data).
I used an initial learning rate of 0.01, then changed to 0.001 at x=26 then finally 0.0001 at x=30. The other training parameters are
momentum = 0.9
mini batch size = 64
all the data centred (mean subtracted) prior to training
all weights initialised using a Gaussian of u=0 and stdev=0.1 (for some reason it doesn’t work with 0.01 like most people do)
The final results are:
training error ~ 17.3%
validation error ~ 18.5%
testing error ~ 20.1%
My last testing error was 24.4% so there is some slight improvement, though at the cost of much more computation. The classification code has been modified to better suit the 24×24 cropped sub-images. Rather than classify using only the centre sub-image all 9 sub-images are used. The softmax results from each sub-image is accumulated and the highest score picked. This works much better than using the centre image only. This is idea is borrowed from cuda-convnet.
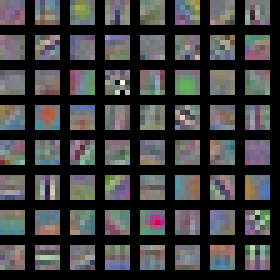
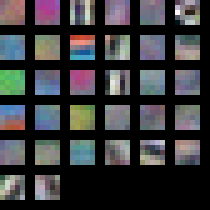
Here are the features learnt for the first layer.
Using cropped sub-images and horizontal flipping the training set has expanded 18 times. The error gap between training error and validation error is now much smaller than before. This suggests I can gain improvements by using a neural network with a larger modeling capacity. This is true for the network used by cuda-convnet to get < 13% training error. Their network is more complex than what I’m using to achieve those results. This seems to be a ‘thing’ with neural networks where to get that extra bit of oomph the complexity of the network can grow monstrously, which is rather off putting.
Based on results collected for the CIFAR-10 dataset by this blog post the current best is using something called a Multi-Column Deep Neural Network, which achieves an error of 11.21%. It uses 8 different convolution neural networks (dubbed ‘column’) and aggregate the results together (like a random forest?). Each column receives the original RGB images plus some pre-processed variations. The individual neural network column themselves are fairly big beasts consisting of 10 layers.
I think there should be a new metric (or maybe there already is) along the lines of “best bangs for bucks”, where the state of the art algorithms are ranked based on something like [accuracy]/[number of model parameters], which is of particular interest in resource limited applications.
Spent like the last 2 weeks trying to find a bug in the code that prevented it from learning. Somehow it miraculously works now but I haven’t been able to figure out why. First thing I did immediately was commit it to my private git in case I messed it up again. I’ve also ordered a new laptop to replace my non-gracefully aging Asus laptop with a Clevo/Sager, which sports a GTX 765M. Never tried this brand before, crossing my fingers I won’t have any problems within 2 years of purchase, unlike every other laptop I’ve had …
I’ve gotten better results now by using a slightly different architecture than before. But what improved performance noticeably was increasing the training samples by generating mirrored versions, effectively doubling the size. Here’s the architecture I used
Layer 8 – Hidden layer, Linear units, 10 output neurons
Layer 9 – Softmax
The training parameters changed a bit as well:
learning rate = 0.01, changed to 0.001 at epoch 28
momentum = 0.9
mini batch size = 64
all weights initialised using a Gaussian of u=0 and stdev=0.1
For some reason my network is very sensitive to the weights initialised. If I use a stdev=0.01, the network simply does not learn at all, constant error of 90% (basically random chance). My first guess is maybe something to do with 32bit floating point precision, particularly when small numbers keep getting multiply with other smaller numbers as they pass through each layer.
The higher learning rate of 0.01 works quite well and speeds up the learning process compared to using a rate of 0.001 I used previously. Using a batch size of 64 instead of 128 means I perform twice as many updates per epoch, which should be a good thing. A mini batch of 128 in theory should give a smoother gradient than 64 but since we’re doing twice as many updates it sort of compensates.
At epoch 28 I reduce the learning rate to 0.001 to get a bit more improvement. The final results are:
training error – 9%
validation error – 23.3%
testing error – 24.4%
The results are similar to the ones by cuda-convnet for that kind of architecture. The training error being much lower than the other values indicates the network has enough capacity to model most of the data, but is limited by how well it generalises to unseen data.
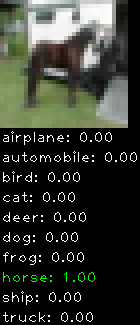
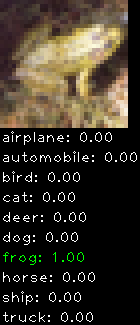
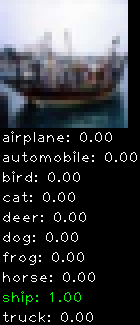
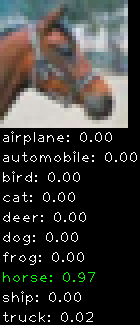
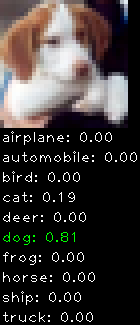
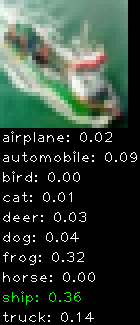
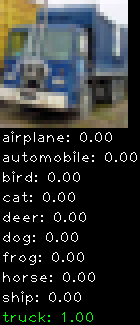
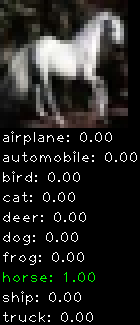
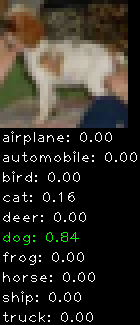
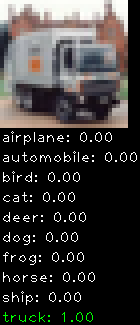
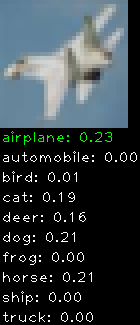
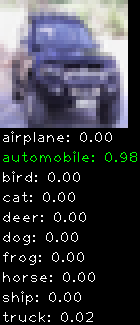
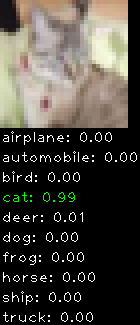
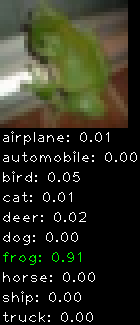
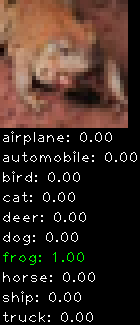
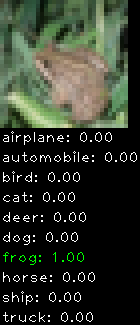
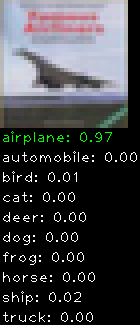
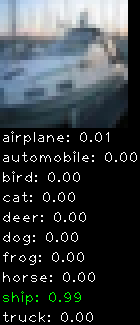
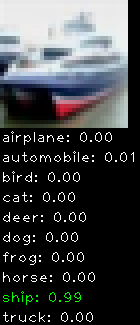
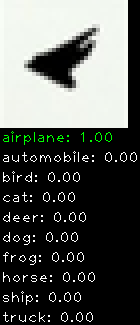
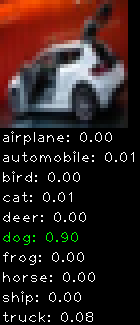
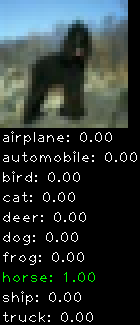
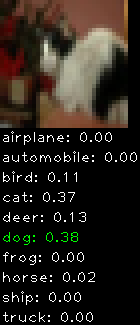
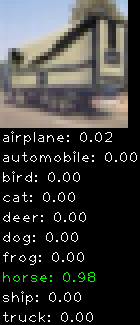
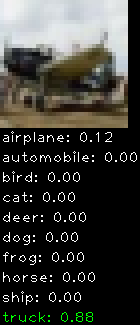
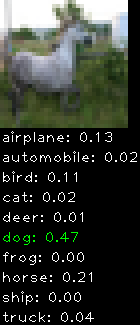
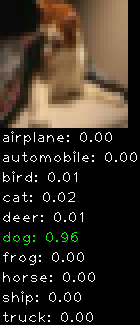
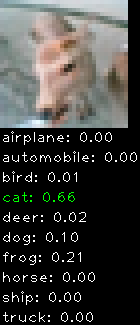
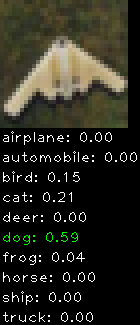
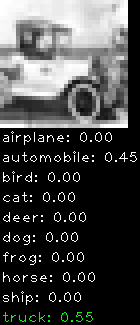
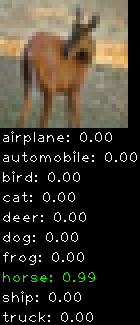
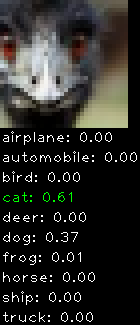
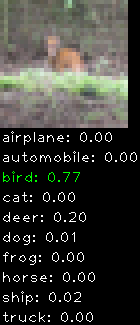
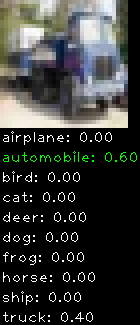
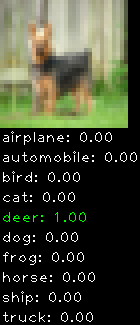
Numbers alone are a bit boring to look at so I thought it’d be cool to see visually how the classifier performs. I’ve made it output 20 correct/incorrect classifications on the test datase4t with the probability of it belonging to a particular category (10 total).
Correctly classified
Incorrectly classified
The miss classification are interesting because it gives us some idea what trips up the neural network. For example, the animals tend to get mix up a bit because they share similar physical characteristics eg. eyes, legs, body.
Next thing I’ll try is to add translated versions of the training data. This is done by cropping the original 32×32 image into say 9 overlapping 24×24 images, evenly sampled. For each of the cropped images we can mirror them as well. This improves robustness to translation and has been reported to give a big boost in classification accuracy. It’ll expand the training data up to 18 times (9 images, plus mirror) ! Going to take a while to run …
I’m also in the process of cleaning the code. Not sure on a release date, if ever. There are probably better implementation of convolutional neural network (EBlearn,cuda-convnet) out there but if you’re really keen to use my code leave a comment below.
I’ve been experimenting with convolutional neural networks (CNN) for the past few months or so on the CIFAR-10 dataset (object recognition). CNN have been around since the 90s but seem to be getting more attention ever since ‘deep learning’ became a hot new buzzword.
Most of my time was spent learning the architecture and writing my own code so I could understand them better. My first attempt was a CPU version, which worked correctly but was not fast enough for any serious use. CNN with complex architectures are notoriously slow to train, that’s why everyone these days use the GPU. It wasn’t until recently that I got a CUDA version of my code up and running. To keep things simple I didn’t do any fancy optimisation. In fact, I didn’t even use shared memory, mostly due to the way I structured my algorithm. Despite that, it was about 10-11x faster than the CPU version (single thread). But hang on, there’s already an excellent CUDA CNN code on the net, namely cuda-convnet, why bother rolling out my own one? Well, because my GPU is a laptop GTS 360M (circa 2010 laptop), which only supports CUDA compute 1.2. Well below the minimum requirements of cuda-convnet. I could get a new computer but where’s the fun in that 🙂 And also, it’s fun to re-invent the wheel for learning reasons.
Results
As mentioned previously I’m working with the CIFAR-10 dataset, which has 50,000 training images and 10,000 test images. Each image is a tiny 32×32 RGB image. I split the 50,000 training images into 40,000 and 10,000 for training and validation, respectively. The dataset has 10 categories ranging from dogs, cats, cars, planes …
The images were pre-processed by subtracting each image by the average image over the whole training set, to centre the data.
The architecture I used was inspired from cuda-convnet and is
Input – 32×32 image, 3 channels
Layer 1 – 5×5 convolution filter, 32 output channels/features, Rectified Linear Unit neurons
Layer 2 – 2×2 max pool, non-overlapping
Layer 3 – 5×5 convolution filter, 32 output channels/features, Rectified Linear Unit neurons
Layer 4 – 2×2 max pool, non-overlapping
Layer 5 – 5×5 convolution filter, 64 output channels/features, Rectified Linear Unit neurons
Layer 6 – fully connected neural network hidden layer, 64 output units, Rectified Linear Unit neurons
I trained using a mini-batch of 128, with a learning rate of 0.001 and momentum of 0.9. At each epoch (one pass through the training data), the data is randomly shuffled. At around the 62th epoch I reduced the learning rate to 0.0001. The weights are updated for each mini-batch processed. Below shows the validation errors vs epoch.
After 85 epochs the results are:
– training error 7995/40000 ~ 20%
– validation error 3156/10000 = 31.56%
– test error 3114/10000 = 31.14%
Results seem okay until I compared them with results reported by cuda-convnet simplest architecture [1][2]: ~8 epochs (?), 80 seconds, 26% testing error. Where as mine took a few hours and many more epochs, clearly I’m doing something wrong!!! But what? I did a rough back of the envelope calculation and determined that their GPU code runs 33x faster than mine, based on timing values they reported. Which means my CUDA code and hardware sucks badly.
On the plus side I did manage to generate some cool visualisation of the weights for layer 1. These are the convolution filters it learnt. This result is typical of what you will find published in the literature, so I’m confident I’m doing something right.
Features learnt by Layer 1
You can see it has learnt some edge and colour filters.
One thing I really want to try at the moment is to get my hands on a newer Nvidia card and see how much speed up I get without doing anything to the code.
I’m not releasing any code yet because it’s very experimental and too ugly to show.
Using Octave today I was taking a guess at the function for factorial might be fact() only to find this amusing snippet:
— Command: fact
— Function File: T = fact()
Display an amazing and random fact about the world’s greatest
hacker.
Running it a few time came up with Chuck Norris equivalent jokes for Richard Stallman:
octave:4> fact

When Richard Stallman executes ps -e, you show up.

octave:5> fact

Richad Stallman's pinky finger is really a USB memory stick.

octave:6> fact

Richard Stallman discovered extra-terrestrial life but killed them because they
used non-free software.

octave:7> fact

Behind Richard Stallman's beard there is another fist, to code faster.

octave:8> fact

Richard Stallman's doesn't kill a process, he just dares it to stay running.
I would like to share some denoising results using sparse modelling based on the SPAMS package. This was inspired by the topic of sparse modeling from the course ‘Image and video processing: From Mars to Hollywood with a stop at the hospital’ at Coursera. I highly recommend this course because it presents some state of the art methods in computer vision that I would have missed otherwise.
I was interested to see how well it would work on real noisy images so I found an old photo I took using a Canon Powershot S3 shot at night on 1600 ISO. Here is a 100% crop of the photo. As you can see, the noise is pretty awful!
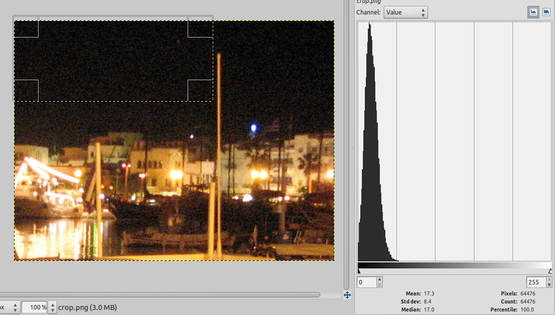
Since there is a black sky in the background I thought it’ll be interesting to see what the noise distribution looks like. What do you know, it’s very Gaussian like! This is great because the square error formulation is well suited to this type of noise.
There are a few sparse model parameters one can fiddle around with, but in my experiement I’ve the kept the following fixed and only adjusted lambda since it seems to have the most pronounced effect
K = 200, dictionary size (number of atoms)
iterations = 100 – Ithink it’s used to optimize the dictionary + sparse vector
patch size = 8 (8×8 patch)
patch stride = 2 (skip every 2 pixels)
Here is with lambda = 0.1
lambda = 0.2
lambda = 0.9
It’s amazing how well it preserves the detail, especially the edges.
Python code can be downloaded here denoise.py_ (right click save as and remove the trailing _)
Where boredom, free time, and curiosity meet together